
Activity 8
Morphological Operations
So, I have this recent mantra that everyday is a new me. I'm gonna start fresh with this next Activity blog, literally. It's 4 AM in the morning its freezing outside. I'm at the 2nd floor of the dorm facing my monitor occasionally looking at the fogging streets of UP. I wipe off the imaginary perspiration on my forehead. Time to stretch some brain fibers.
This next activity is all about morphological operations. I cringe upon looking at the activity manual. This will going to be mathematical. Using basic etymology, to morph means to change shape or structure. In the sense of image processing, morphological operation denotes processes of improving an image's shape for further processing.
Morphological operation assumes an image to be binarized, meaning that the pixel values are tagged as 1 (ON - foreground) or 0 (OFF - background).
This activity explores two general implementations of morphological operation; dilation and erosion.
In a nutshell, erosion removes pixels on the boundary of an image A with respect to a structuring element B while dilation does the reverse by adding pixels. Mathematically,
EROSION
DILATION
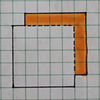
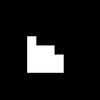
For the erosion process, the output is the set of all points z such that B translated by z is contained in A. On the other hand, the output for the dilation process is the set of all points z which are translations of a reflected B that when intersected with A is not the null set. Basically, eroding an image will make it smaller while dilating it enlarges the image. Shown below are the erosion and dilation of a 5x5 square, a right triangle, a 10x10 hollow square, and a 5-pixel cross. They are eroded and dilated with structuring elements of a 2x2 square, a 2x1 rectangle, a 1x2 rectangle, a 3-pixel cross and a diagonal.
EROSION
structuring
element 5
structuring
element 4
structuring
element 3
structuring
element 2
structuring
element 1


object 1


object 2

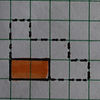


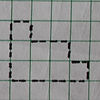
object 3


object 4


DILATION
structuring
element 1
structuring
element 2
structuring
element 3
structuring
element 4
structuring
element 5
object 1


object 2


object 3


object 4


In the structuring elements, I placed a dot to one pixel that will serve as the reference point for the morphological operation. We see that the erosion process indeed shrinks the image while the dilation process enlarges it. The choice reference point would not affect the final shape of the output image but would change pixel membership because of the change of the origin of translation.
Now, I will try to replicate and validate the manual results in SCILAB by using the functions ErodeImage() and DilateImage() for erosion and dilation respectively and CreateStructureElement() to compose the structuring elements. Shown below are the results of the simulations:
EROSION
object 1

object 2

object 3

object 4

structuring
element 1
structuring
element 2
structuring
element 3
structuring
element 4
structuring
element 5


DILATION
structuring
element 5
structuring
element 4
structuring
element 3
structuring
element 2
structuring
element 1
object 1


object 2


object 3


object 4


In SCILAB, I chose a size of 11x11 pixels for the simulation except for the hollow square which is 13x13. I enlarged all the images for improved quality using Paint. We see that indeed, the manual operation was successfully recreated using SCILAB.
The next activity is applying combinations of erosion and dilation to detect cancer cells from an image. Cancer cells are abnormal cells that appear bigger than normal cells. To separate these abnormal cells, combining erosion and dilation is necessary.
Commonly, three operators are used in practice; closing, opening, and top-hat. Closing operation [CloseImage()] dilates an image first and then erodes it making holes in the image disappear depending on the size of the structuring element. Opening operation [OpenImage()] on the other hand does the inverse. This operation is useful when we want to preserve a pattern or shape that is similar to the structuring element. Lastly, the Top-Hat operation [TopHat()] has two types; white top-hat and black top-hat. The white top-hat opens the image first and then subtract the output from the original image while the black top-hat closes the image first before subtraction.
Oh I forgot to mention, all the functions used in SCILAB for morphological operations were imported in a toolbox called Image Processing Design (IPD).
The first thing to do to separate the cancer cells is to determine the average area of the normal cells. Shown below is an image containing only normal cells together with its grayscale histogram:


To make the area estimation more manageable, I divided the image into 9 subimages using GIMP and obtained their grayscale histograms as shown:


In SCILAB, I binarized the image using SegmentByThreshold() and used 210 as the threshold value from the average of the peaks in the histograms of the subimages. From the binarized image, I experimented what operation is best suited to separate perfect blobs. The closing operation made the circles connected because of dilation and the top-hat operation made the image look really dark. I used only the opening operation with a circle of radius 10 as a structuring element. Shown below is the output from the subimages:


Using the function SearchBlobs(), the area of the blobs are measured. The mean and the standard deviation was found to be 499.61364 and 46.54491. This value disregards the areas of the clumped blobs for a single blob area averages from 400 to 600 pixels from the histogram.
Now that we know, the average area of a blob, we can now separate cancer cells (bigger) from normal cells. Shown below is the test image with cancer cells together with its histogram:


I then binarized the image, opened it and obtained a histogram of its area as shown below:


Using the function FilterBySize(), I filtered out the area range of normal cells with the resulting image:

We see from the image that there are still normal cells around and because they are connected the areas are coincidentally near the area of the cancer cells. Using another opening operation, I got the following fabulous result:
To be honest, this is the most tedious activity I've done so far. It is also the activity were I learned the most. Close to my heart , and close to my condition.
I would give myself a rating of 12/10 for producing all the required images. I would like to thank wix.com for their very nice website platform. Of course, there is a need for me to acknowledge my seatmates Patrick and Robby for being so helpful and responsive to my questions.
References:
[1] M. Soriano. “A8 - Morphological Operations,” Applied Physics 186 Activity Hand-outs, 2014.
[2] MathWorks. Morphological Dilation and Erosion. https://www.mathworks.com/help/images/morphological-dilation-and-erosion.html
[3] HIPR2. Image Processing Learning Resources. http://homepages.inf.ed.ac.uk/rbf/HIPR2/hipr_top.htm